WELCOME TO MY BLOG...MY THOUGHTS ON LANDSCAPE, TRAVEL AND NATURE PHOTOGRAPHY PLUS SOME HINTS ON GEAR AND PHOTOGRAPHY IN GENERAL
THE CAPTURE IS THE SCORE; THE PRINT IS THE PERFORMANCE
If you've ever visited my gallery in the Coyote Gulch Art Village in Kayenta, you know that I really enjoy producing large, sharp, colorful images. The process to accomplish that goal begins with good capture technique. Good technique and processing the image after capture will be subjects for the future.
I want to take this time to explain how I print my images. After initially processing the image in Adobe Light Room 3.0., I save the image in a folder as a Photoshop PSD file as well as DNG and TIFF formats. If I upload the image to my website, I save it as a high resolution JPG with minimum compression.
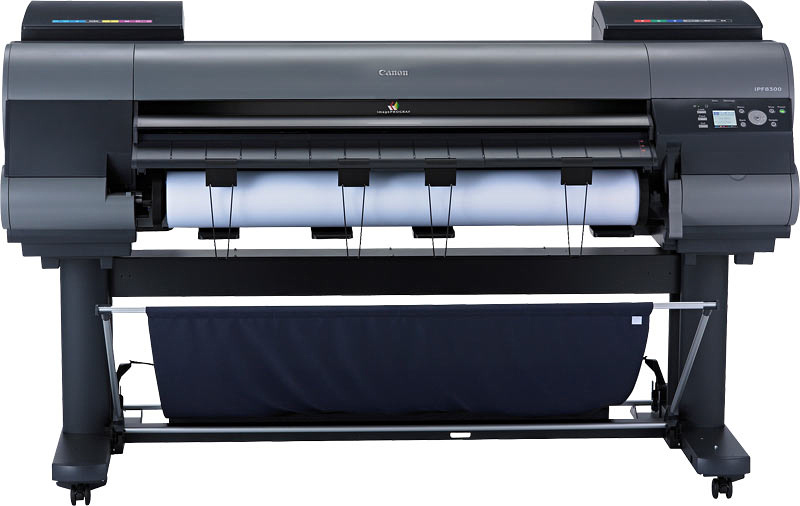
When I print the image myself I re-size and sharpen the image as a 16 bit TIFF file. I then send the image to the printer which is a 44" wide Canon ImagePrograf 8300. This printer utilizes twelve 700 milliliter pigment ink cartridges. Pigment ink technology has evolved to the point the inks employed by any of the major printer manufacturers (Canon, HP, Epson) can create prints that properly treated can last well over 100 years without fading.
I chose the Canon 8300 based on my very positive experience with a prior Canon ipf8000. The printer is extremely reliable, never suffers from head clogs and if I have a question I can call Canon and get a very quick response from staff at their call center in Virginia. The downside of the printer is physical size. It's approximately 75" wide, 36" deep and weighs about 350 pounds. But the image quality it delivers makes it all worthwhile.

After I finish printing, usually once or twice a week, I let the prints cure for about 24 hours to allow all the inks on the paper or canvas surface to out gas. When I print on canvas I typically use a type manufactured by Breathing Color, a company based in Australia with offices and distribution here in the US. I use LYVE, their premium grade of canvas which reproduces as wide a color gamut as any canvas currently available. The canvas is 'museum grade' in terms of archival/long lasting qualities.
After my prints have cured ( I usually accumulate a number) I spray coat them with a water soluble polymer solution using an HVLP spray gun. Polymers by their nature reject UV. The coating not only protects the ink surface from minor scuffs and abrasions but offers additional UV protection as well.
After the prints are coated, I allow them to cure 24 hours before having them stretched over frames by Sunset Framer in St. George, Utah. I tend to not be confined by standard aspect ratios and depending on aesthetic judgements as to how I crop an image, off the shelf pre-cut stretcher bars may not be available. Sunset Framer builds custom frames for my specific needs, stretches the print, attaches the hardware and makes it ready for the customer to hang in his/her home.
I personally prefer a canvas presentation for a number of reasons:
Archival/longevity, no glass thus no reflections, eliminates need for matting and traditional framing, more cost effective when large mural size images are required and the impact of colorful, rich images that typically are only achieved with glossy papers but without reflection issues. I realize some people may prefer traditional paper prints and I gladly offer any of my images on fine art papers, as well.
I'm headed to New Zealand later this week. Check in as I'll post on a regular basis along with selected images as the trip progresses.
![]()
CHARLES WOOD'S PHOTOGRAPHY BLOG
I purchased a Pentax 645N in 1998. I still own this camera and the associated lenses that go with it. For the last 14 years it has been absolutely reliable and has traveled the world with me in planes and backpacks. Another classic but somewhat exotic camera that I enjoyed using immensely was a Fuji G617 medium format panorama camera. The G617 delivered images on 120/220 roll film nearly 7 inches wide that are for all practical purposes about half the frame size of a 5x7 view camera frame and properly scanned and printed, can deliver wall sized prints 9-10 feet wide with outstanding sharpness. Many of the panorama images I display in my gallery, such as my Monument Valley Totem Sunrise, were shot with a G617.
Not wanting to be left behind in evolving technologies and having a technical background in my other careers, early on I purchased a digital Nikon CoolPix point and shoot camera. It had a sensor all of 2 megs in size but it made created very nice 5x7 prints, was great for family snapshots and that type of thing. Later the CoolPix went on to one of my nieces and was replaced by a 5 meg Olympus C5050, definitely a step up in quality and capable of nice 8x10 prints. I still offer for sale an image that I captured with the Olympus and it holds up well when I don't push the size limitations of the file.
By 2004 I decided to take a baby step into more serious digital photography with an early 8 megapixel Canon Rebel XT along with some Canon L series professional lenses. I knew bodies were going to change and evolve rapidly but lenses far less, so I felt comfortable investing in expensive lenses rather than expensive bodies. The opposite approach is a mistake many photographers continue to make...while the camera body is important, the lenses can be the critical element in capturing a stunning image. Over the last few years I've owned various Canon consumer and professional bodies. The XT, then an XTi and then a 40D followed by an XSi and 5DmkIl. Each step brought incremental improvements, particularly so with the 5Dmkll.